Among all game styles, platformers have stood out for decades and
have proved to be a simply fun to play array of characters, blocks,
tubes and monsters. In this tutorial we’ll create a simple Mario-style
platformer using the
HTML5 game framework, which allows you to speed up the construction of a simple and playable prototype.
This will be a three part series. In this first part, we’ll focus on
constructing the level using the Tiled map editor, loading the level
into the game and setting up the platform type of game (basically a
character that runs and jumps around a scrollable level). In the
second part of the series we’ll add enemies with different behaviours. The third tutorial will have coins and lives for the player.

The Requirements
We’ll be using the
Quintus game development framework on this tutorial. This Open Source framework was created by
Pascal Retig and is aimed for the creation of video games with JavaScript for mobile, desktop and beyond.
Starting points to get familiar with Quintus are the
official guide, the
G+ community and my previous
Quintus tutorial.
- Familiarity with HTML, CSS, JavaScript and basic object oriented concepts.
- Clone or download Quintus from it’s Github page.
- Setup a local webserver. We need to run the code in this tutorial in
a web server and not by just double clicking on the files. More on that
later. WAMP for Windows, MAMP for Mac. On linux just type sudo apt-get
install apache2.
- Download and install the Tiled game editor, available for Linux, Mac and Windows
- Have your favorite IDE ready (Netbeans, Eclipse, Sublime2, Notepad++, VIM, or any tool you use for coding).
- Download the tutorial source code and game assets.
- Crack your knuckles and start coding!
The Setup
Create a new folder in your web server public folder (www folder in
most cases), let’s call this new folder “zenvaplatformer”. In it, create
the following sub-folders and empty files, and copy the JS files
contained in Quintus/lib where shown:
zenvaplatformer/index.html
zenvaplatformer/data/
zenvaplatformer/lib/ —> copy the Quintus/lib JS files here
zenvaplatformer/images/
Heads up!
When working with Quintus, as well as other libraries from Github, it’s
always good to keep an eye on the repo page as new features are
constantly being added. You don’t wanna stay behind with an old version
of the library. In the case of Quintus a lot of work is being done at
the moment so keep an eye for new features and API changes!
After downloading the files from
here.
I’d recommend you do not look at the code unless you wanna ruin the fun
of coding along. What you will need to do though is copy the game
assets from /data and /images to their corresponding project folders.
The Map
All games, and in particular platformer games take place in a virtual
world. In our case it’ll be a 2D, tile-based world. Tile-based means
that the world is composed of individual “tiles” or blocks. Think of old
NES games, how you could just find block patters that repeated
themselves. Well that’s what we are building here too.
In order to create this 2D, tile-based world we’ll use the
Tiled game editor. The Quintus engine has support for TMX file loading, which is one of the formats that can be produced by Tiled.
The map for this example is ready and waiting for you in the /data
folder, but I still want to guide you through the process of a basic map
creation:
1. Open Tiled and create a new map. In the dialog box you have to
specify the size of the map in terms of how many tiles or blocks it will
have for width and height. You also specify here the size of the tile
in pixels. In our example the width of the map is 40 tiles, the hight 10
tiles, and we’ll be working with tiles of 70×70 pixels.
2. Now where do we get the tiles from? we need what’s called a
spritesheet or tileset, which is the name given to image files that
contain all the tiles/sprites of the game. You can get plenty of free
spritesheet at OpenGameArt.org, just read carefully the license of the
images and give the author proper attribution in case they are Creative
Commons. If they are Public Domain you can just use them without
restriction.
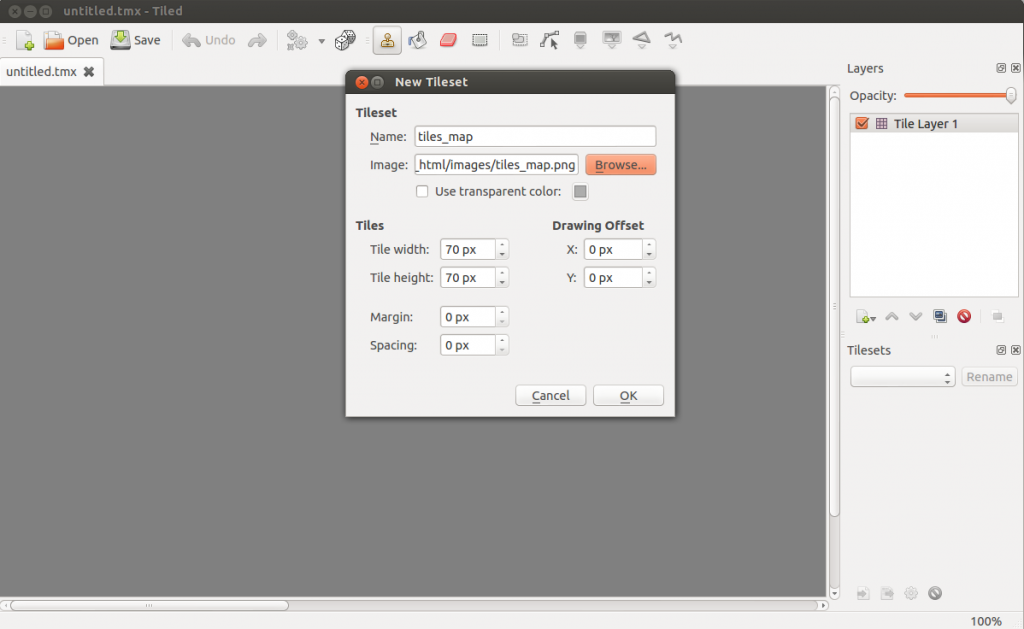
But hey you just downloaded the example files so we do have a
spritesheet to have a play with. Go to Map -> New Tile, then “Browse”
and look for the file /images/tiles_map.png. Make sure you set the tile
dimensions correctly (70×70), also there the margin, spacing and
offsets should be 0.
With the current version of Quintus, you can’t use spritesheets that
have spacings or margins. Also, the first block in the spritesheet (from
left to right) will not be shown so leave that blank as I have done in
the example file.
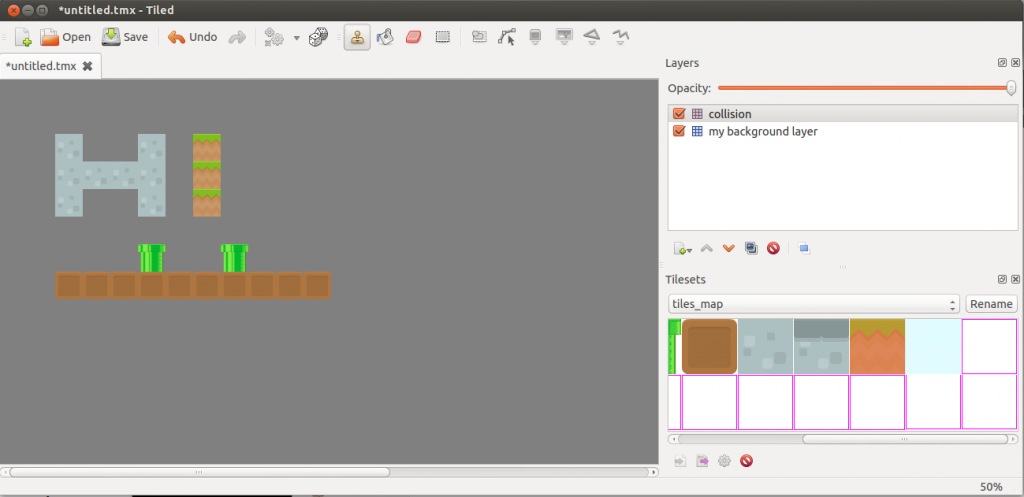
3. Having loaded the tileset we can now “paint” a map using the
buttons on the menu. In the platformer example we’ll have two layers,
one to hold the collision elements (the elements that will block the
player’s path, or sustain him as a ground) and a background layer for
just decoration. Create a new layer using the icon with the “+” under
the layer’s area. Give them both names to distinguish them. NOW you can
start painting your map.
4. If we want to have our files loaded with Quintus we need to save
them in non-compressed XML format (tmx extension). Go to “Preferences”,
then click on the “General” tab, where it says “Store tile layer data
as” make sure XML is selected. Now you can save your map and this type
of TMX maps are the ones you can use in your HTML5 games.
The Quintus Setup and Asset Loading
Copy the following contents to your index.html file:
<!DOCTYPE html>
<html>
    <head>
        <title></title>
        <meta http-equiv="Content-Type" content="text/html; charset=UTF-8">
        <script src='lib/quintus.js'></script>
        <script src='lib/quintus_sprites.js'></script>
        <script src='lib/quintus_scenes.js'></script>
        <script src='lib/quintus_input.js'></script>
        <script src='lib/quintus_anim.js'></script>
        <script src='lib/quintus_2d.js'></script>
        <script src='lib/quintus_touch.js'></script>
        <script src='lib/quintus_ui.js'></script>
    </head>
    <body style="background-color: black;">
        <script>
            var Q = Quintus()
                .include("Sprites, Scenes, Input, 2D, Touch, UI")
                .setup({
                    width: 960,
                    height: 640
                }).controls().touch();
        </script>
    </body>
</html>
What we are doing here is basically setting up the Quintus object
with the modules that we’ll use, activating the touch screen and
platform controls. For a description of what each module does check out
the
official guide and also in my previous
Quintus tutorial I’ve gone through the basics of the framework.
The next step is to load our game assets and to initiate and show our
first level. An important concept in Quintus is that of “stages” which
can be understood as “layers” that go on top of each other. Scenes are
instructions that are “executed” in a stage. For example I have two
stages (layers), I put one scene that loads the level in one stage and I
put another scene that shows the game score in the other stage (that
goes on top of the first one). In this example we’ll just have one stage
which is where the level is loaded.
//load assets
Q.load("tiles_map.png, player.png, level1.tmx", function() {
  Q.sheet("tiles","tiles_map.png", { tilew: 70, tileh: 70});
  Q.stageScene("level1");
});
See how we load the images, then we create a sprite sheet for the
tileset of the map. When you do so don’t forget to specify the
dimensions of the tiles.
The Level
We’ve put on stage a scene called “level1″. We need now to initiate
this scene. This is where we’ll load the game background and collision
layers from the TMX file that came with the example (you could also load
your own map here).
Q.scene("level1",function(stage) {
    var background = new Q.TileLayer({ dataAsset: 'level1.tmx', layerIndex: 0, sheet: 'tiles', tileW: 70, tileH: 70, type: Q.SPRITE_NONE });
    stage.insert(background);
    stage.collisionLayer(new Q.TileLayer({ dataAsset: 'level1.tmx', layerIndex:1,  sheet: 'tiles', tileW: 70, tileH: 70 }));
});
We are creating two Q.TileLayer objects here. One will be used for
the background and one for the collision layer. See how we make
reference to the TMX file and the layerIndex, which is the order of the
layer in the Tiled map (you can also open the TMX file in a text editor
to figure out which layer goes where). Important as well to make
explicit the tile dimensions here.
For the background we are using type: Q.SPRITE_NONE which means it
will be ignored by the player when it comes to collision detection.
Collision and how it works is explained in depth in my previous
Quintus tutorial.
You should be seeing part of the game map now in your browser.
The Player
The last bit we’ll be looking at in this first part of the tutorial
series will be how to add the player and make it a “platformer” player.
Firstly, we need to create a class for the player. Add the following
after the Quintus initiation code:
Q.Sprite.extend("Player",{
    init: function(p) {
      this._super(p, { asset: "player.png", x: 110, y: 50, jumpSpeed: -380});
      this.add('2d, platformerControls');
    },
    step: function(dt) {
        if(Q.inputs['left'] && this.p.direction == 'right') {
            this.p.flip = 'x';
        }
        if(Q.inputs['right']  && this.p.direction == 'left') {
            this.p.flip = false;
        }
    }
  });
Quintus has it’s own class and inheritance system and what we are
doing here is creating a subclass of Q.Sprite called Q.Player. The
constructor begins by running the parent’s constructor with some
parameters: the player image file, the initial location (x,y) in the
map, and jumpSpeed, which overrides the default jumpSpeed given by the
component “platformerControls”, which is the concept I’m heading onto
next.
Objects can have components added, which is basically adding a set of
methods and properties. We are adding the 2d component, which provides
basic physics (speed, acceleration, gravity) and collision detection. We
are also adding the platformerControls component which makes the player
movable with the keyboard (and touch screen as well since we run
touch() when initiating the Q object.
The second method in Player, step(), is our door to the game loop. In
most games there is something called a “game loop”, which refers to a
set of instructions that are executed very often (many times per second)
and allow the game to check for different states and modify variables
accordingly.
All sprites in Quintus can have a step() method added. What we check
here will be checked on the game loop. In our case we check the user
input and flip our sprite accordingly, so that it faces the direction it
walks to.
Time to Play
As you might have guessed, the last step towards having a player we
can control is to actually place it in the level, for which we need to
add the following in the scene initialisation:
var player = stage.insert(new Q.Player());
stage.add("viewport").follow(player,{x: true, y: true},{minX: 0, maxX: background.p.w, minY: 0, maxY: background.p.h});
The viewport will add a “camera” that will follow the player through
the level as we are used to seeing. This camera will follow the player
on x and y (the second parameter) and it will be restricted to the level
area, so that we can’t show spaces outside of this level. You could
restrict the camera to any area you want as long as you provide the
coordinates in this optional parameter.
Righto, now we have a fully playable platformer demo. There are no
enemies yet though, but don’t worry, that’s what we’ll be adding in the
next tutorial in this series.
The Files
Download this tut’s source code
here.
What Else to Check Out
At
Zenva we have two high quality video courses on HTML5 game development that cover the entire process of making a game with HTML5.